Stardev Matched Filter Update

On July 1st, 2021 the two-component SCUBA-2 beam profile parameters were updated in accordance with the results published by Mairs et al 2021. This caused a change in the Matched Filter post-processing.

When using a Stardev installation post-July 1st, 2021, executing the matched-filter method is expected to increase the measured peak fluxes of bright point sources by ~15% relative to older versions of Starlink. A similar factor may apply to faint point sources in otherwise “blank fields” but this requires further testing.

See this software blog post for more details!


Stardev Matched Filter Change

On July 1st, 2021 the two-component SCUBA-2 beam profile parameters were updated in accordance with the results published by Mairs et al 2021. This caused a change in the Matched Filter post-processing.

When using a Stardev installation post-July 1st, 2021, executing the matched-filter method is expected to increase the measured peak fluxes of bright point sources by ~15% relative to older versions of Starlink. A similar factor may apply to faint point sources in otherwise “blank fields” but this requires further testing.

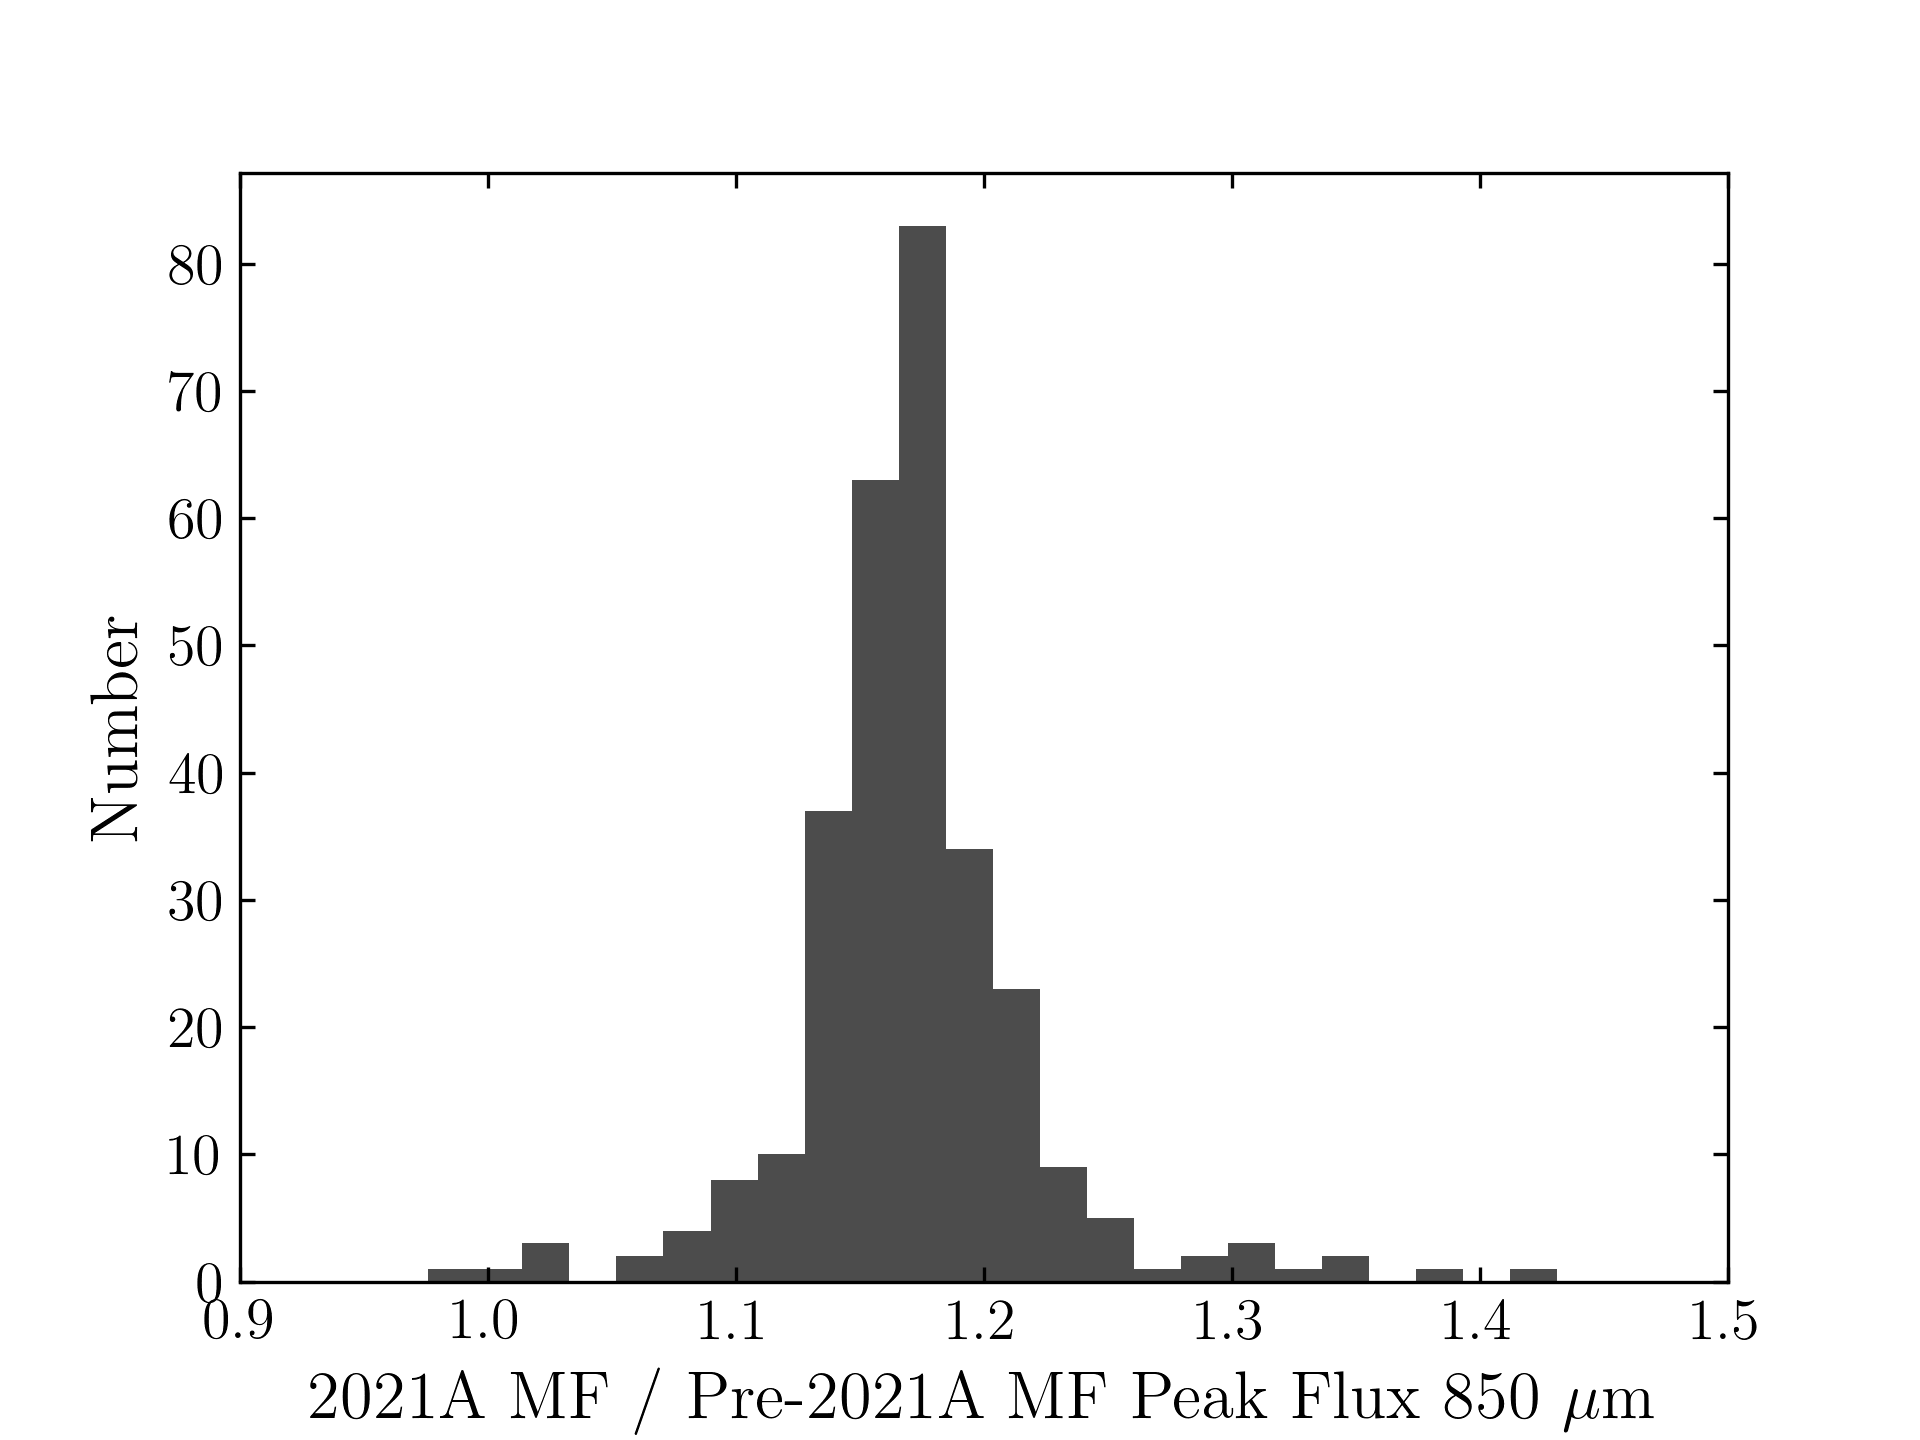
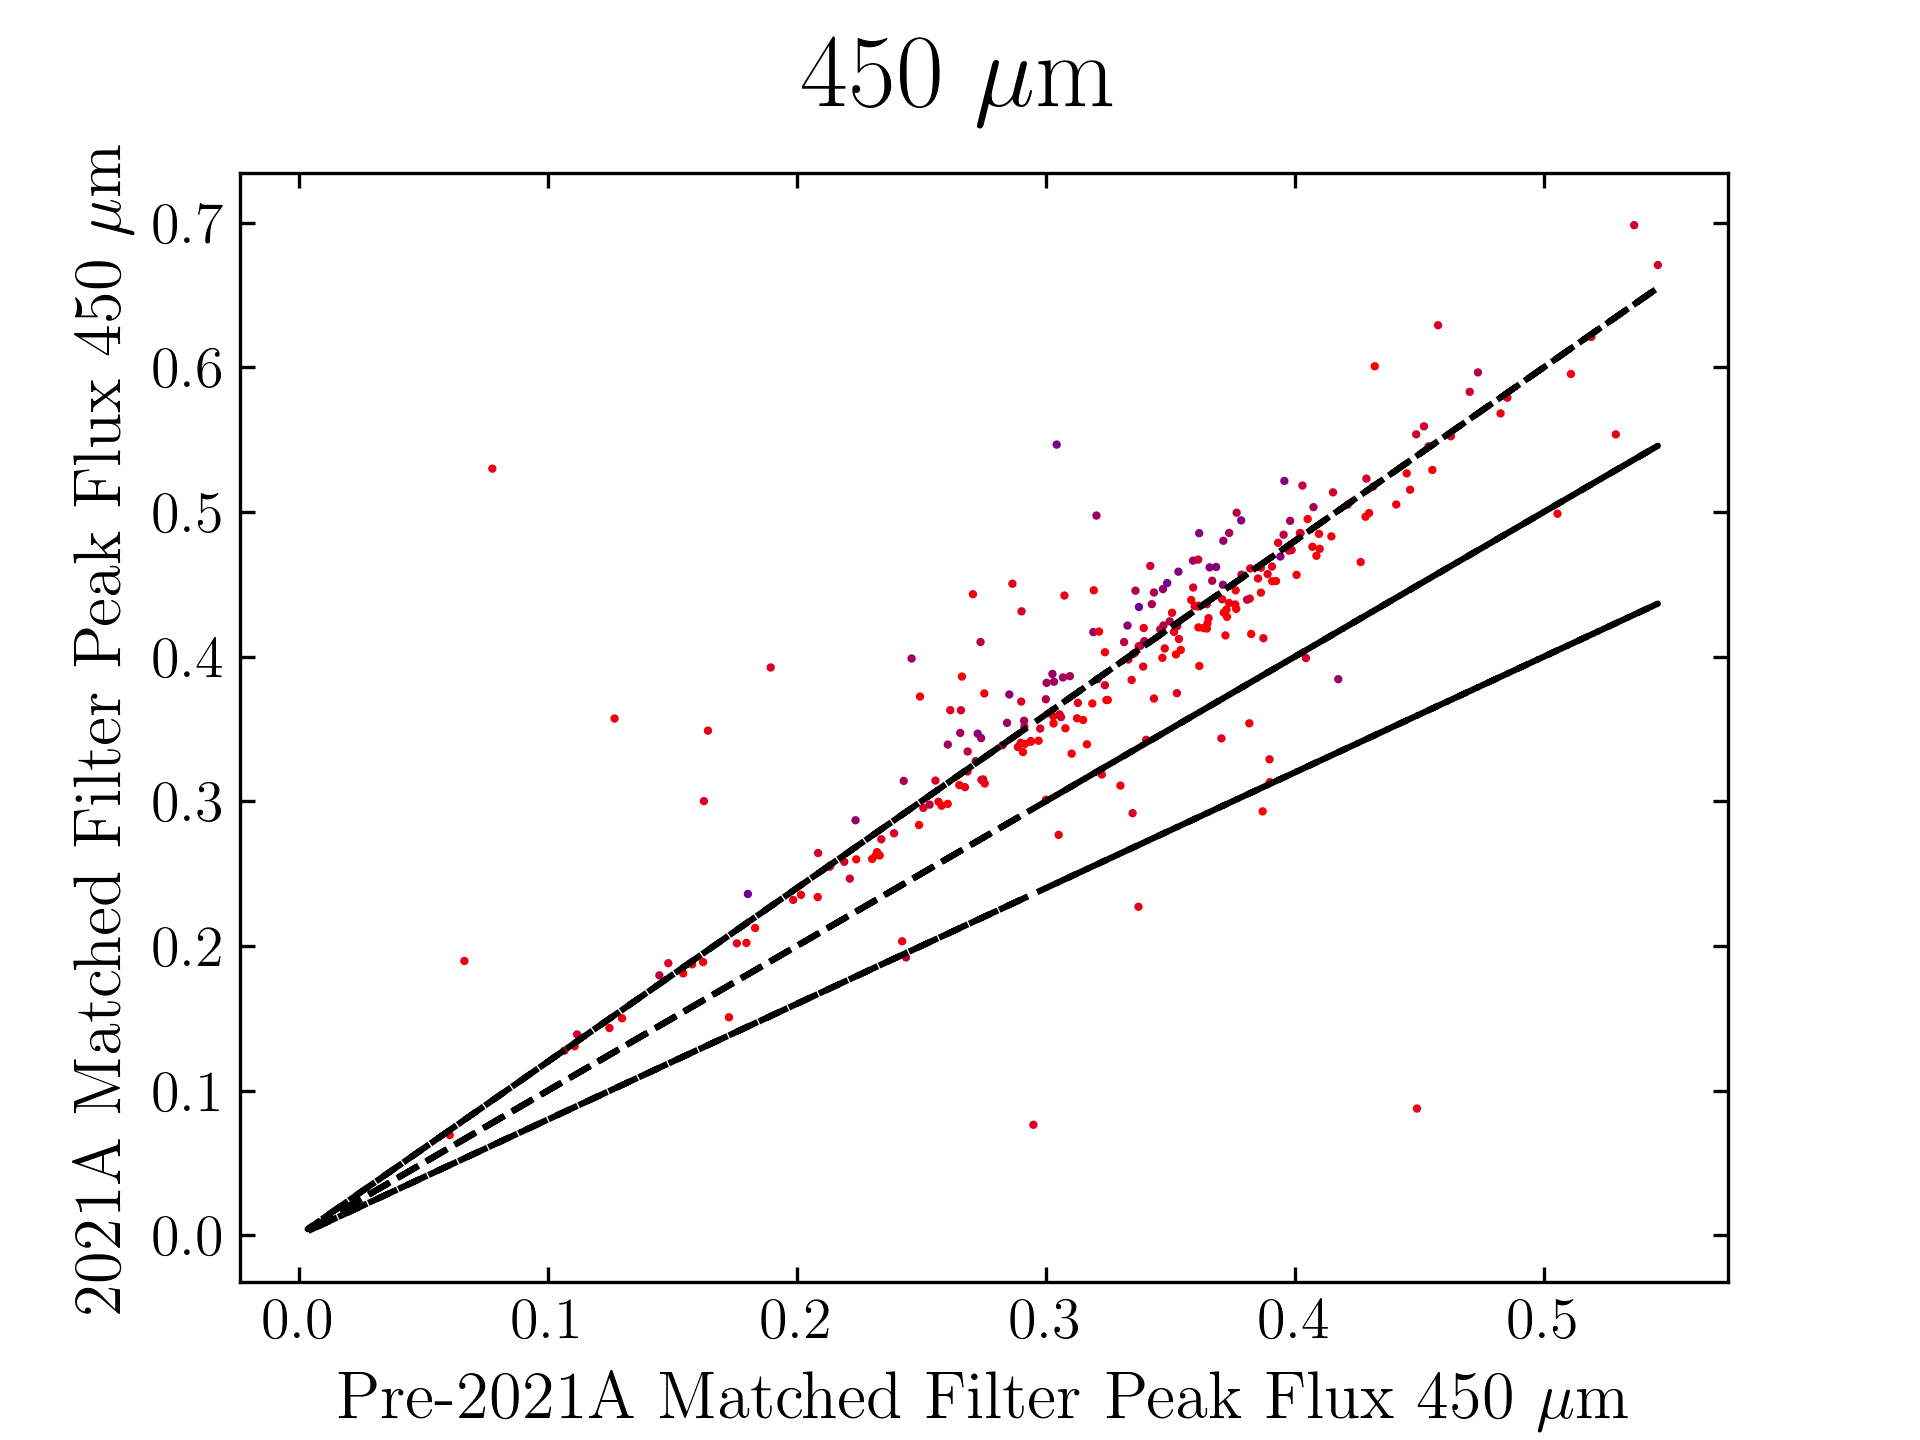
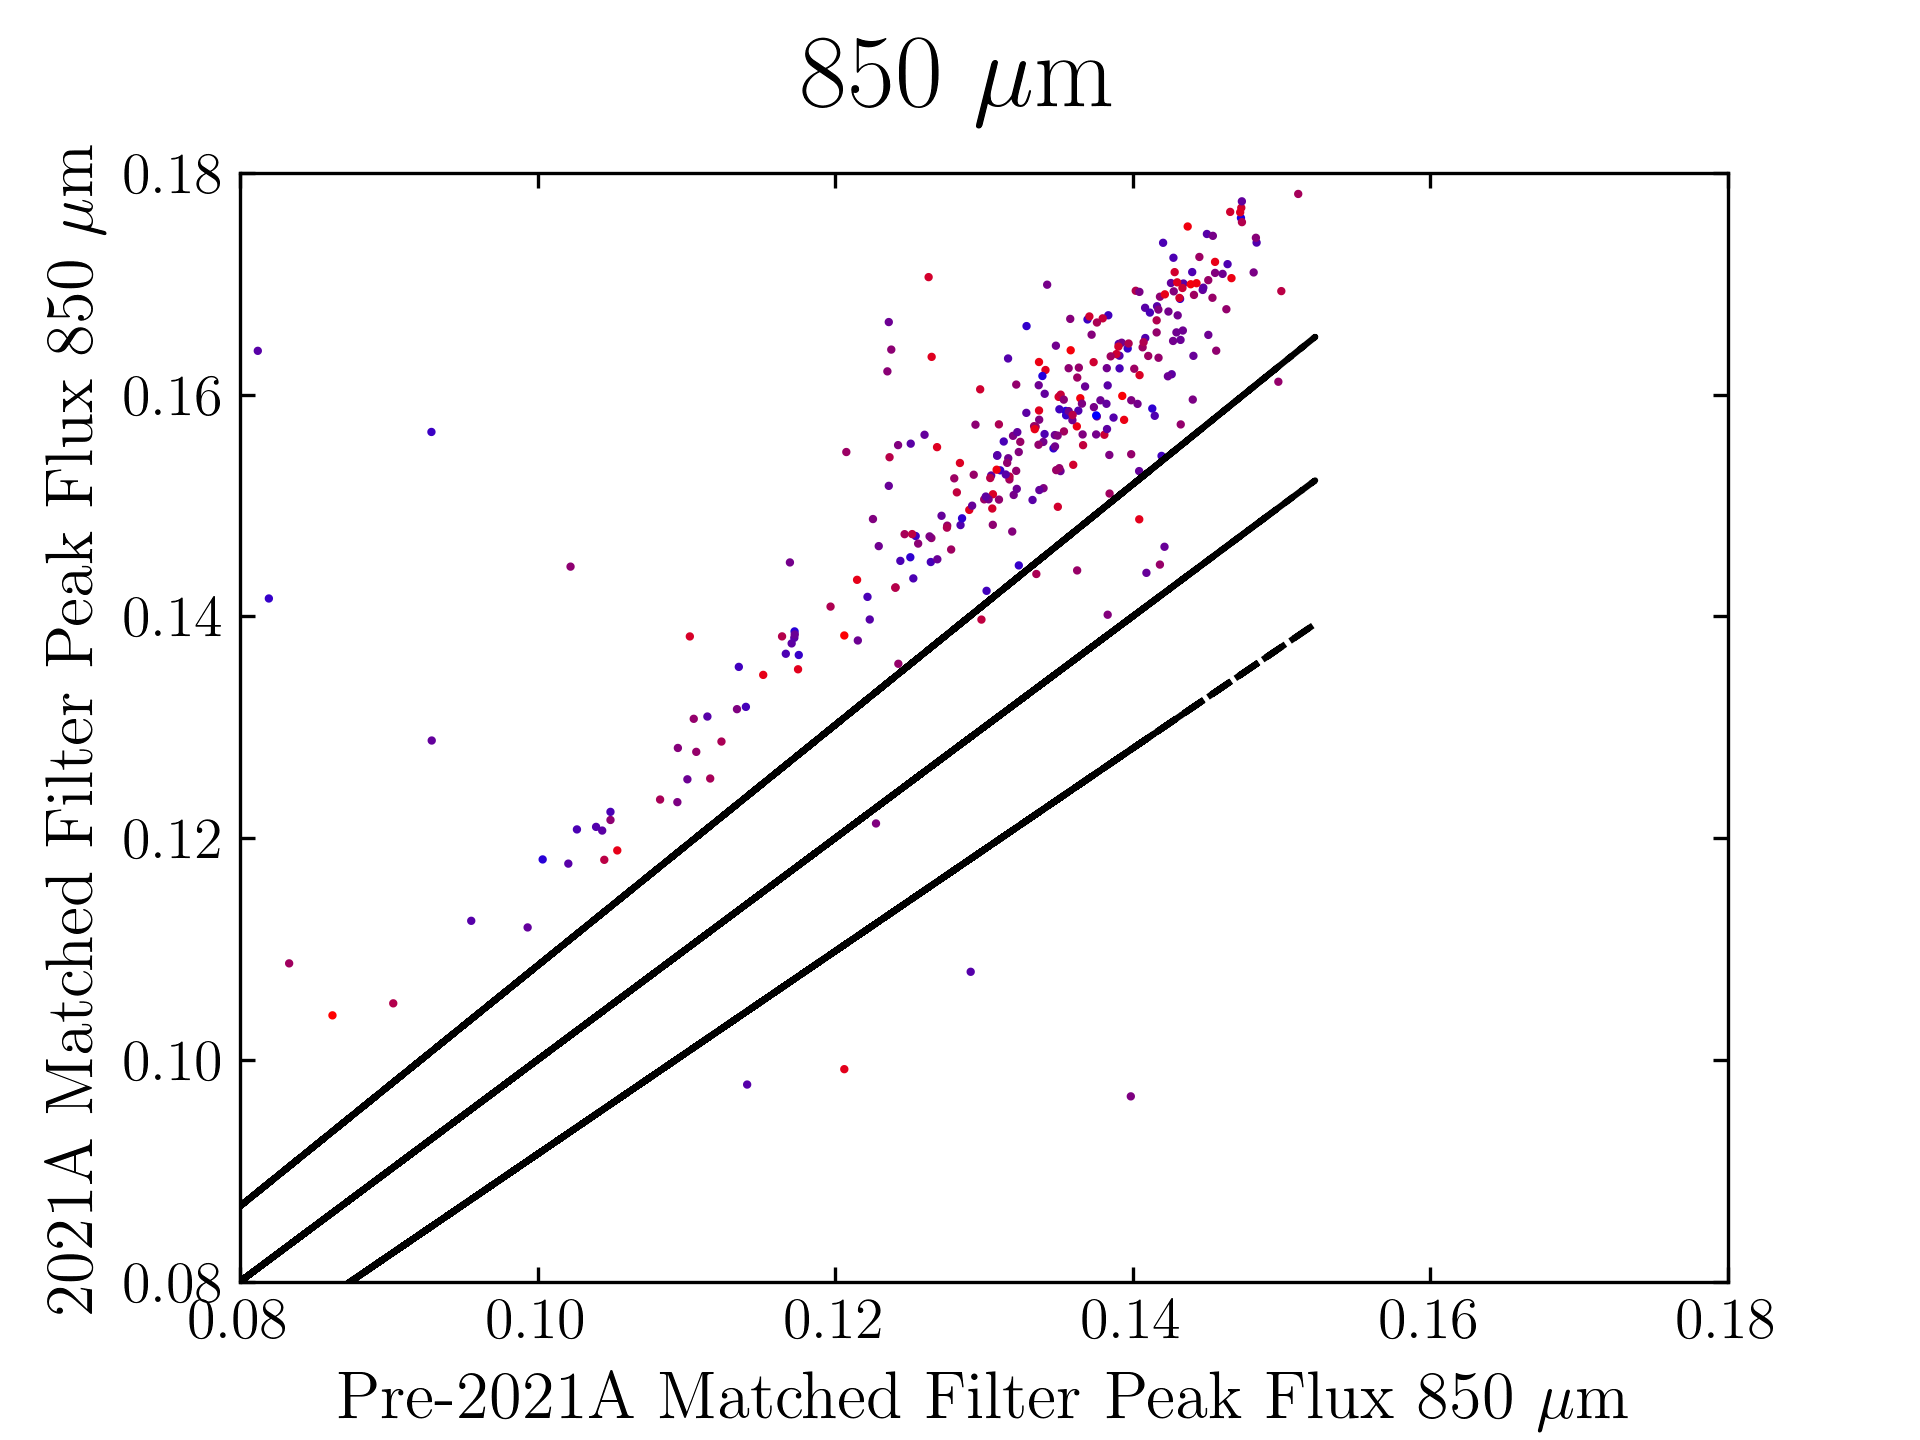
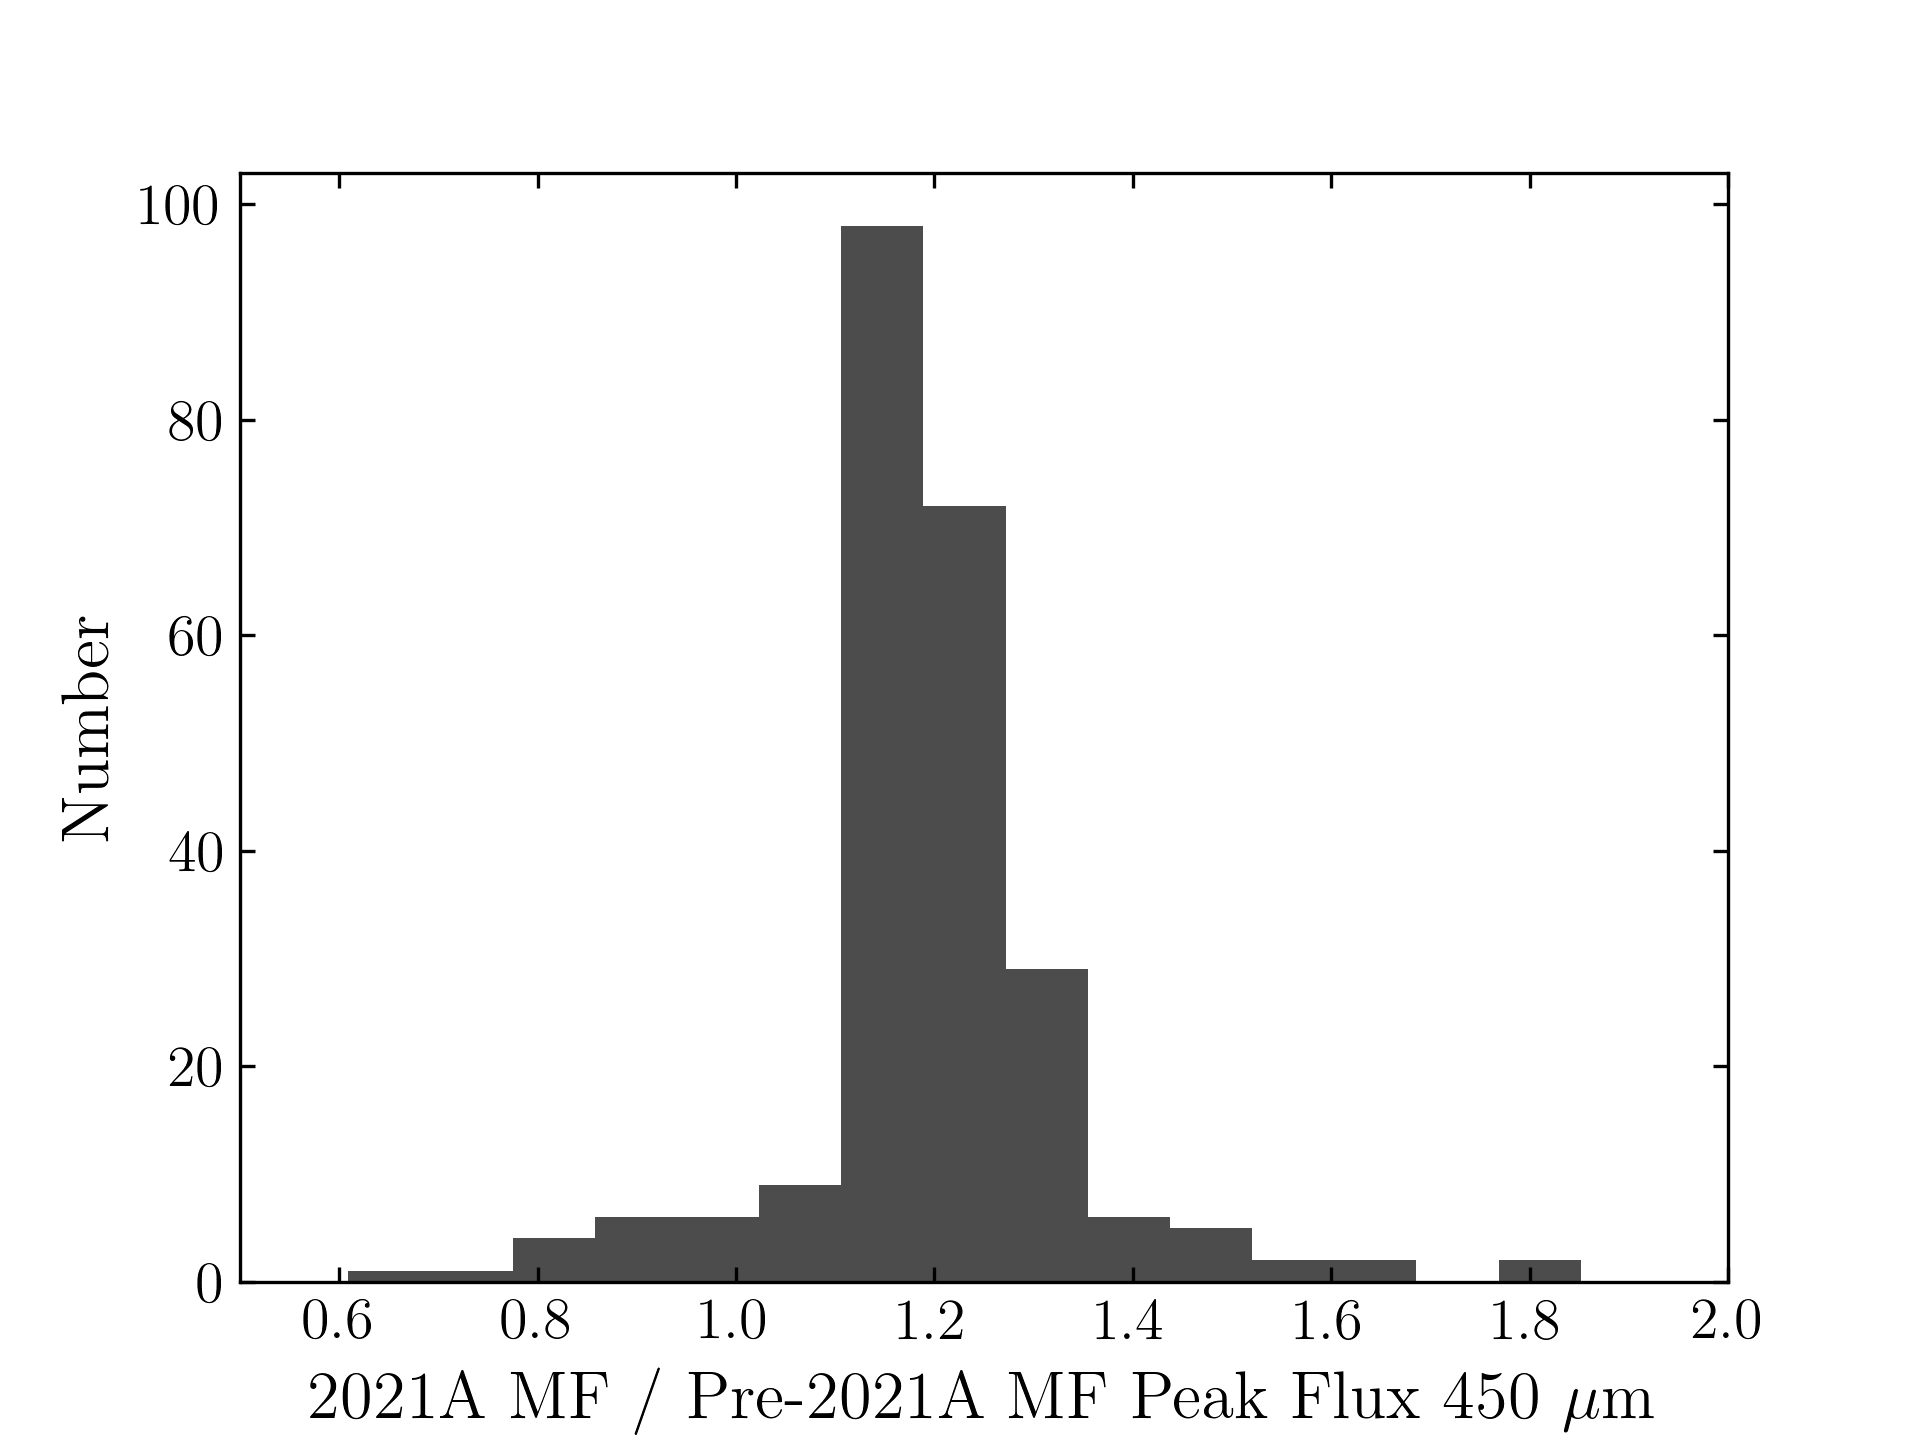
The plots, below, show comparisons between the 2018A Starlink and most recent Stardev matched filter implementation on Uranus calibrator observations taken between 2016-11-01 and 2021-04-13. Note that the Stardev version consistently returns peak flux values that are ~15-20% higher than before due to updated empirical beam measurements presented in Mairs et al 2021.

The beam patterns for matched filtering purposes are described as a combination of two Gaussian functions:

G_total = α*G_mb + β*G_sec,

where each Gaussian profile, G, is of the form exp[−4*ln(2)*(r/θ)^2], where “r” is the radial distance from the centre and θ is the FWHM of the profile, both measured in units of arcseconds. The first component, G_mb represents the “main beam” response. The second component, G_sec, is an approximation of the “secondary beam” or “error beam”, which describes the flux in the shoulders of the profile. α and β are coefficients describing the relative contribution of each component (the amplitudes). The broad error beam includes factors such as sidelobes due to diffraction, static dish deformations, and dish deformations induced by thermal gradients.

450 microns:
850 microns:
The original SCUBA-2 Beam Parameters were presented by Dempsey et al. 2013:

450 microns:

α = 0.94
β = 0.06
θ_mb = 7.9
θ_sec = 25.0

850 microns:

α = 0.98
β = 0.02
θ_mb = 13.0
θ_sec = 48.0

The updated SCUBA-2 Beam Parameters are presented by Mairs et al 2021:

450 microns:

α = 0.89
β = 0.11
θ_mb = 6.2
θ_sec = 18.8

850 microns:

α = 0.98
β = 0.02
θ_mb = 11.0
θ_sec = 49.1

These values represent the median results after fitting the two-component model to all Uranus calibrator observations since May, 2011 above a significant transmission threshold (see Mairs et al 2021).

The total area of each beam profile, A, can be calculated by:

A = {π/[4*ln(2)]}*[α*(θ_mb)^2+β*(θ_sec)^2].

Comparing the Dempsey et al 2013 beam areas to the Mairs et al 2021 beam areas reveals a ~20% difference at both wavelengths (in practice, there is a spread around this typical 20% value, see plots, above).

Note that previously, it has been common practice in cosmology publications employing “Blank Field” data reduction recipes (e.g. REDUCE_SCAN_FAINT_POINT_SOURCES, REDUCE_SCAN_FAINT_POINT_SOURCES_JACKKNIFE) to apply a correction factor of ~10% in order to compensate for flux lost due to filtering. This 10% factor was derived by inserting a bright Gaussian point source into the raw power versus time stream of individual observations and measuring the response of the model to the filtering during the data reduction process (e.g. Geach et al. 2013, Smail et al. 2014). We recommend repeating this experiment with the new Starlink 2021A matched-filter implementation for your specific data in order to determine whether the correction factor is still necessary.

KAPPA/POL2MAP bug causes incorrect variances and error values

A bug was introduced into the cmult and cdiv commands in the Starlink KAPPA package on 21st May 2021. This bug caused incorrect Variance values to be stored in the output and was fixed on 12th July 2021. Consequently, anyone who uses these commands and who last rsynced the nightly Starlink build from EAO between these dates should consider rsyncing the current nightly build, which includes the bug fix.

POL2 users should be aware that the cmult command is used within the pol2map script when converting values from pW to mJy/beam. This means that vector catalogues produced by pol2map will contain incorrect DI/DQ/DU values if starlink was rsynced between the two dates mentioned above.  Again, the solution is to rsync the current nightly build, which includes the bug fix.

Bug in POL2MAP

A  recent change in the Starlink KAPPA package causes the SMURF pol2map command to crash . The main symptom is a message at the end of the pol2map logfile that looks something like this:

+ -50
. could not convert string to float: '+ -50'

The change that causes this problem occurred on 30th April 2021 so will affect Starlink installations copied from EAO on or after that date. The problem has been fixed today (19th May) so anyone affected by this problem should copy starlink again after completion of the next nightly build.

Thanks to Jeremy Yang for reporting this problem.

A Change to the Format of NDF Data Files

Data files created at the JCMT are usually distributed in the Starlink NDF format (see “Learning from 25 years of the extensible N-Dimensional Data Format“). An NDF usually contains several arrays, each with a well defined purpose (data values, variances, quality flags, etc). However, each such array has in the past been limited in size to no more than 2,147,483,647 pixels (this is because the software used to access NDFs uses 32 bit signed integers to store pixel counts, etc). Recent work at the EAO has removed this limitation by changing the relevant libraries to use 64 bit integers instead of 32 bit integers. This is a necessary first step towards supporting future instruments that will produce much larger data arrays.

One consequence of this work is a small change to the way NDFs are stored on disk – the integer values that store the pixel origin of each array are now stored as 64 bit integers (type “_INT64”) rather than 32 bit integers (type “_INTEGER”). New NDFs created with these _INT64 values will be readable by software in the “2018A” Starlink release (July 2018) and subsequent nightly builds, but will not be readable by older versions of Starlink. However, NDFs in the new format can be converted to the old format by doing:

% setenv NDF_SHORTORIGIN 1
% kappa
% ndfcopy newndf.sdf oldndf.sdf

It should be noted that the changes described above do not mean that existing Starlink commands in packages such as Kappa or SMURF  can now be used to create or process huge NDFs. It just means that the NDF format itself, together with the infrastructure libraries needed to access  NDFs, are ready for the next stage in the process, which will be the modification of Kappa, SMURF, etc, to use the new facilities. The one exception is that the CUPID package has now been updated to use the new facilities and so should now be capable of handling huge NDFs.

The new features described above are present in the Starlink nightly build on or after 27th November 2019.

As a final note, this is all new stuff so please be on the look-out for any strange behaviour in the new version of Starlink and report it to EAO.

Changes to the NDF (.sdf) Data Format

Those of you who carefully read our Starlink release notes (everyone, right?) will have noticed that our last release (2018A) included a new HDF5-based data format.

The 2018A release could read data in the new format, but by default still wrote data in the old format. In preparation for our next release we have now changed the default data format in our codebase. This means if you download the Linux* nightly build from EAO (see http://starlink.eao.hawaii.edu/starlink/rsyncStarlink) you will now start producing data files in the new format.

Our data files will still have the same ‘.sdf’ extension. You can tell if a file is in the old or new format most easily by using the unix command ‘file’. For an old-style .sdf file you will see ‘data’. for the new-style .sdf files you will see: ‘Hierarchical Data Format (version 5) data.

If you need to convert a new style .sdf file to the old format, you can set the environmental variable ‘HDS_VERSION’ to 4, and then run the ndfcopy command on your file. The output file will now be in the old style format. You’ll need to unset the variable to go back to writing your output in the new format.

E.g. in bash, you could do:

kappa
export HDS_VERSION=4
ndfcopy myfile.sdf myfile-hdsv4.sdf
unset HDS_VERSION

If you need to use the old format all the time you could set HDS_VERSION=4 in your login scripts.

If you want to know more detail, you should know that the NDF data structures you use with Starlink are written to disk in a file-format known as HDS. This new file format we are now using is version 5 of the HDS file format, and is based on the widely used Hierarchical Data Format (HDF) standard. It is possible to open and read the new-style files with standard HDF5 libraries — e.g. the python H5py library. There are a few unusual features you may find, particularly if looking at the history or provenance structures. The new format is described in Tim Jenness’ paper (https://ui.adsabs.harvard.edu/#abs/2015A&C….12..221J/abstract). Our file format and data model are described in the HDS manual ( SUN/92) and the NDF manual (SUN/33). If you’re interested in the history of NDF and how it compares to the FITS file format/data model you could also read Jenness et al’s paper on Learning from 25 years of the extensible N-Dimensional Data Format

We haven’t changed the format that the JCMT or UKIRT write raw data in, so all raw data from both these telescopes will continue to be written in the old format. We also haven’t yet changed the format for new JCMT reduced data available through the CADC archive, but that is likely to happen at some point. We don’t intend to remove the ability for Starlink to read old files. The version of the starlink-pyhds python library available through pypi can read the new-format data files already.

If you have any questions or issues with the new file format you can contact the Starlink developers list https://www.jiscmail.ac.uk/cgi-bin/webadmin?A0=STARDEV, or if you prefer you can directly email the observatory via the  helpdesk AT eaobservatory.org email address. If you’re subscribed to the JCMT/EAO software-discussion@eaobservatory.org  email address you can send comments there (see https://www.eaobservatory.org/jcmt/help/softwareblog/ for subscription links/instructions).

*Only the Linux build because we currently have an issue with our OSX nightly build and it is not updating right now– our hardware has died and I haven’t got the temporary replacement up and running yet.

How do I start using Starlink software?

You can download the Starlink suite of data reduction, analysis and visualisation tools from http://starlink.eao.hawaii.edu. Binary installations are produced for Mac OSX and for Linux Centos-6 compatible systems.

Please follow the instructions on the download page for installation and required dependencies.

Before you can use the Starlink software in a terminal, you will have to set it up in the current terminal session. If you are running a sh derived shell( sh, bash or ksh) please enter the following commands into your current terminal session:

export STARLINK_DIR=/path/to/your/starlink/installation
source $STARLINK_DIR/etc/profile

If you’re using a csh derived shell (csh or tcsh) please instead run the following commands:

setenv  STARLINK_DIR /path/to/your/starlink/installation
source $STARLINK_DIR/etc/login
source $STARLINK_DIR/etc/cshrc


After running these commands, you will be able to start running Starlink commands in the current terminal. If you switch to a new terminal, you will need to repeat those commands before you can run Starlink software. We do not recommend setting these files up in your standard login configuration scripts, as there are name conflicts between some Starlink software and some commonly used linux software — for example, we have a command named ‘convert’ which allows use of astronomy-specific file format conversions. This would conflict with the common command ‘convert’ from ImageMagick.


Under Linux, the starlink set up will also include Starlink libraries in the  LD_LIBRARY_PATH variable, and these can conflict with other packages such as CASA. By only setting up the software in a specicifc terminal, you can have one terminal running Starlink and another running software such as CASA without any conflicts.


Once Starlink is setup, you can run commands and load the various Starlink packages. For example, to run commands from the package KAPPA you would simply type the command kappa into your terminal, and you would be shown the following output:

$ kappa
 KAPPA commands are now available -- (Version 2.3)

Type kaphelp for help on KAPPA commands.
 Type 'showme sun95' to browse the hypertext documentation.

See the 'Release Notes' section of SUN/95 for details of the
 changes made for this release.


How do I find the noise, NEFD and observation properties of a SCUBA-2 observation?

We have a PICARD  recipe named SCUBA2_MAPSTATS which will calculate various properties of the observation, its noise and its average NEFD given a single reduced SCUBA-2 observation.

You can run this recipe as follows (in a terminal, after setting up the Starlink software):

picard -log sf SCUBA2_MAPSTATS scuba2_reduced_file.sdf

This will produce an output file named ‘log.mapstats’ in the directory specified by the environmental variable  ‘ORAC_DATA_OUT’ (if set), or in the current directory if that is not set.

This file currently contains entries for each of the following columns:

# (YYYYMMDD.frac) (YYYY-MM-DDThh:mm:ss) () () () (um) (deg) () () () () (s) (s) () () () () (") (") () () ()
# UT HST Obs Source Mode Filter El Airmass Trans Tau225 Tau t_elapsed t_exp rms rms_units nefd nefd_units mapsize pixscale project recipe filename

with some of the units indicted in the top line (ones that are always the same), and others specified as a column (these can be different depending on what was applied to the dataset).

These tell you information about the observation — the time it was started (UT and HST), the observation number (column labeled Obs, i.e. was it the 1st, 2nd,3rd etc SCUBA-2 scan of the night), the sourcename, the Mode (Daisy or Pong), the filter (450um or 850um), the Elevation, Airmass, Transmission, Tau225 and Tau at the start of the observation (taken from the fits headers of the file). The total time spent on source is given in t_elapsed, and the average exposure time for a pixel is given by t_exp.

The RMS is calculated from the variance array of the observation, and its units are explicitly given. The NEFD is calculated from the data in the NDF extension ‘MORE.smurf.nefd’, and its units are explictly given.

The RMS, exposure time and nefd are calculated over the central square region of the map, defined by the MAP_WDTH and MAP_HGTH headers.

If multiple files are run through SCUBA2_MAPSTATS, either in a single call of PICARD or by repeatedly running PICARD in the same terminal on different files, the results will be appended to the existing log.mapstats file. The final columns — project, recipe and filename — are given to ensure it is clear to users which line of the logfile corresponds to which input file.

SCUBA2_MAPSTATS is only designed to work on reductions of a single observations. On coadded observations it could produce misleading results, or even fail completely to work.

If your data is calibrated, this will assume that the units are correctly set in the file, and that the noise and NEFD extensions have also been correctly updated. This can be done by using the PICARD recipe CALIBRATE_SCUBA2_DATA.

Converting frequency and velocity frames

For details on the various frequency and velocity definitions and rest frames used in JCMT heterodyne observations, please see our Velocity Considerations page.

Common requests:

  1. to convert processed data from the JCMT Science Archive, which is in Barycentric frequency, into radio line-of-sight velocity () in LSRK. You can use the following Starlink commands to do this, assuming you have started with a file named ‘archive_file.fits’. These would be copied into a terminal, after setting up the Starlink software within that terminal. The lines starting with a # symbol are comments.
    # Load the convert package to enable conversion from FITS to NDF
    convert
    
    # Convert your archive file into Starlink Data Format (NDF)
    fits2ndf archive_file.fits archive_file.sdf
    
    # Load the KAPPA package (contains many useful routines)
    kappa
    
    # Set the 3rd axis of the coordinate system to be in units of radio velocity
    wcsattrib ndf=archive_file.sdf mode=set name=system\(3\) newval=vrad
    
    # Set the standard of rest to be the LSRK
    wcsattrib ndf=archive_file.sdf mode=set name=StdofRest newval=LSRK
    
    # OPTIONAL: if fits output is required, convert the file back to fits
    ndf2fits archive_file.sdf archive_file_radiovelocity.fits
    
  2. to add together spectral data from moving targets (eg comets) onto a ‘source’ (‘cometocentric’) velocity scale:
    makecube <rawdatafile00099> system=GAPPT alignsys=TRUE out=out99.sdf
    wcsattrib out99.sdf set alignoffset 1
    wcsattrib out99.sdf set skyrefis origin
    wcsattrib out99.sdf set sourceVRF topocentric
    wcsattrib out99.sdf set stdofrest source
    wcsattrib out99.sdf set alignstdofrest source
    wcsattrib out99.sdf set SourceVel <velocity>
    
    wcmosaic out*.dat . . .